
Standard tape
We now have experience with tire tape and recommend it for riders who do not want to work with traditional tubular tire glue. (Also see our Tubular Tire Advice page.) There are two types: Standard (yellow box) and Extreme (orange/red box). We almost always recommend the Extreme because it does much better in sustained braking such as in mountainous conditions.
If you are new to tubulars and want more personal
help or advice on them please contact us,
we are happy to help riders with any level of experience.
We mount a lot
tubulars tires.
We also mount and ship tubular tires mounted, what we call our Race Ready
ProgramTM.
If you are new to tubulars we recommend starting with them race ready. We sell
all the tires and accessories you might need for your wheels. To order, check our Race
Ready ProgramTM and contact us. We
also appreciate your feedback -- tell us how
to make these instructions clear and complete.
Warning! Always make sure you are comfortable with and aware of your
skill limits in both tire mounting and bike handling. Please test your
limits before you commit yourself to a sharp high-speed turn. For safety, always
check your tires before you ride. Do this by trying to push your
tires off the rim with your thumbs -- they should feel secure!

Extreme tape
Prepare the rim. Apply the tape (see below). Put a cardboard scrap on the floor. Put the wheel on the cardboard with the valve hole at the top, mount the tire by carefully putting the tire valve into the valve hole and stretching the tire along the rim toward the floor. Use the floor to backstop and hold the wheel while you stretch the tire downward.
Maintain tension on the tire as you mount. You will need to stretch the whole tire on the wheel to make it fit. Get the tire on straight as you mount it. While still maintaining a good hold on both sides of the tire, lift the wheel off the floor to get the last 6 to 12 inches of tire mounted. Don't let go of your tire -- keep the pressure on!
Once mounted, check the base tape of the tire on both sides of the mounted rim. If the tire is straight, there should be an even amount of tire base tape showing all around the tire. You should try to lift and move the tire if you need to straighten it.
Video from Tufo

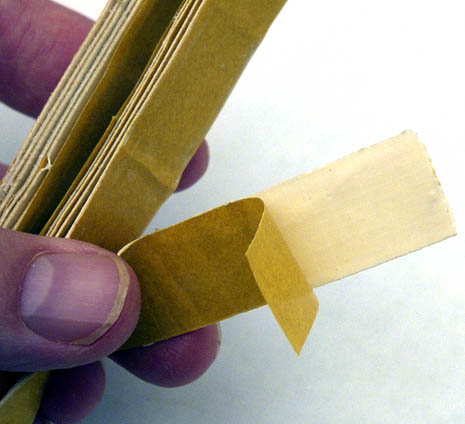 Take
a good look at the unpackaged tape. There are two sides to the
tape. One side is uniform and has yellow backing paper. That is
the side that goes down on the wheel rim.
Take
a good look at the unpackaged tape. There are two sides to the
tape. One side is uniform and has yellow backing paper. That is
the side that goes down on the wheel rim. 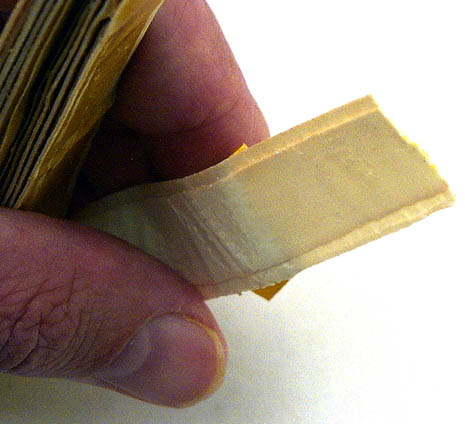 The
other side has a narrow layer visible in the center. That is the side that goes
toward the tire.
The
other side has a narrow layer visible in the center. That is the side that goes
toward the tire. The rim side of the tape is designed to be stickier and as a result remains on the rim when the tire is later removed. This allows you to mount a new tire onto the same tape.
We pre-stretch and fully inflate every tire we sell on stretcher rims we keep for that purpose. We make sure that each tire is stretched for at least a day or more (often more like a week) before we mount or ship it. We also prep the tire valve core, valve nut and mount a valve extender. (see prepare from the tubular tire advice page.)
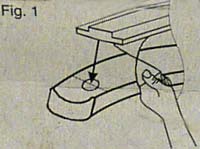 Fig.
1, tells us to start the application of the tape to the rim beginning
at the valve hole. We advise that the rim is first cleaned. Note that
the stepped or ridged side
is outward toward the tire.
Fig.
1, tells us to start the application of the tape to the rim beginning
at the valve hole. We advise that the rim is first cleaned. Note that
the stepped or ridged side
is outward toward the tire.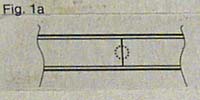 Fig.
1a, tells us to completely cover the rim up to the valve hole.
We stop at the start of the hole. We have not worried about coving the edges of
the valve hole.
Fig.
1a, tells us to completely cover the rim up to the valve hole.
We stop at the start of the hole. We have not worried about coving the edges of
the valve hole.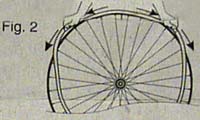 Fig.
2, tells us to start mounting the tire with the valve at the
top. Insert the tire valve and start stretching the tire along the
rim as you mount it.
Fig.
2, tells us to start mounting the tire with the valve at the
top. Insert the tire valve and start stretching the tire along the
rim as you mount it. 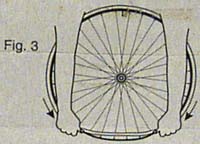 Fig.
3, tells us pull the tire all the way round to the bottom. Look at NO!
figure number 2 for the consequences of not pulling all the way around.
Fig.
3, tells us pull the tire all the way round to the bottom. Look at NO!
figure number 2 for the consequences of not pulling all the way around.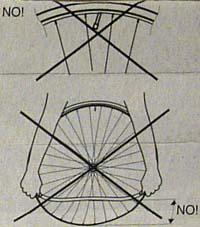 NO!
#1, says to make sure the tire valve is straight. This requires the
valve to be inserted first and as straight as possible. If it is crooked it
will wear and cause a flat.
NO!
#1, says to make sure the tire valve is straight. This requires the
valve to be inserted first and as straight as possible. If it is crooked it
will wear and cause a flat.NO! #2, says not to delay stretching the tire until you reach the bottom. If you try this you will not be able to make it fit. Pre-stretch the tire and start stretching from the top top like Fig. 2 and 3.